Tuesday, December 8, 2009

Back Porch Progress

The back porch is really starting to take shape. Since buying the house we have repositioned the water heater, washer, and dryer to maximize the usable space of the back porch. After doing this, the porch looked like this:


The dark circular area is where the previous water heater was located. The dark rectangular area is where the dryer was located. The washer was between them, but I did experimental painting over that area prior to taking this picture. Disclaimer: I have no idea how to paint. And neither does my husband. This was my first time painting a house. I did not sand or use a primer. I do not even know if I should feel bad about not doing so. I just scraped the loose paint from the really bad spots where the appliances previously stood. Then I swept and hosed the whole porch down with a water hose. I also do not know if this was a reckless thing to do since it did end with large amounts of water falling into my basement. Anyway, this is what it looked like when I finished:

During the process I also removed duct tape which was covering holes and an electrical receptacle which was no longer wired.
Before:

After:

Before painting over everything, I tried to note any clues which might give an indication to how the porch might have looked originally. Underneath the previous appliances, I noticed a layer of orange/gold between the raw wood and the gray paint:


This gold/orange wood color looks similar to other woodwork in the house:

This is the baseboard in the living room that I have started stripping. Though I knew all the woodwork was originally stained/shellacked this color (based on my own findings and based on the Pearson house next door), I did not think the exterior woodwork would have ever been stained. I figured it had always been painted, but I believe the preceding pictures show that the back porch decking was likely originally stained rather than painted. I find it interesting, but we will definitely keep it painted. I doubt that it is in good enough condition to be sanded and stained at this point. In fact, I have not ruled out the need to replace it in our lifetime. The wraparound porch was replaced around 20 years ago and seems to be doing well. This back porch (sometimes called a service porch) is rather weak in places, especially where the washer and dryer were. Even though they were on a piece of plywood, the wood underneath seems to have suffered. 

But for now the back porch is on hold for the winter. We are now focusing on interior painting because the downstairs wood floors will be restored in February. I am also trying to strip the paint from most of the trim in the house. Everyone, and I mean everyone is telling me that this is a bad/impossible idea. Whatever. People on other house blogs I follow do it as a rule rather than an exception. I am baffled that people in  real life tell me that it is impossible or not worth it to strip paint from woodwork. Now I have a point to prove.

Monday, November 16, 2009

We have had several significant house developments in the couple weeks since my last post. The most noticeable is that three trees were taken out between our and Andy's house. One was on our property, and two were on his property. They were all within a couple feet of his house and disturbing his foundation. He is going to replace them with smaller trees with less invasive roots; fruitless pears, I believe. This was our view from the back porch:


Here is the work being done:


And here it is now:


And best of all we got all the wood for next year's fires. Note the broken landscape lighting fixture on the bottom center. I think Richard broke each one on that side of the house while tossing wood. Truly, though, he just finished them off; I do not think a single one was really in good working order. He wants to replace them with something similar. That will be some time far from now.


Yeah...about the night time picture...it seems every time I think I have enough pictures and progress to post, I get near the end of writing and then realize I do not have an "after" picture. Because I only have the free time to post at night, I tend to just save what I have written and plan to get back to it the next day so that I can take a day time picture. But that does not really happen. The next thing I know, it has been two weeks, and my post is way too long and still not posted, so this is the best I can do, folks.

I finally remembered to take pictures of the entry stairs. When we first bought the house, they were solid gray, which is also the color of the decking on the porch. It looked to me like the porch just vomited up some stairs. The paint was peeling pretty badly. Here is what it looked like when we moved in:


Wow. Now that I go back and look at the picture, I realize just how bad it looked. Kinda creepy. It looks like there's an old forgotten widow dying in our house. Or maybe I'm just being dramatic. I also notice how awkward looking it is that only the top riser is painted the royal blue. Anyway, the same time we had the guys paint the fence we had them paint the stairs, too. And we changed the color just a bit. We made the risers white, but left the actual steps gray. I think it looks more inviting this way:


Oh shoot. I just realized the top riser is still royal blue. It is weird how much you see wrong with your house when you are scrutinizing pictures of it for the world to see. I will have to go outside during the daylight tomorrow and see if it is really that noticeable. For comparison here is the back porch, and its top riser is white:


I am not sure; I guess it looks better white. Feedback on this would be much appreciated. THE GAS CAN! Why is there always random bits of trashy clutter in our yard? It does not make me feel better that our neighbor is out there every single morning picking up the garbage that blows into his yard. He also does things like raking, mowing, and watering. Then he comes over to our tacky gas can yard and pulls weeds and such. Who needs an HOA? I do not need to pay a monthly fee to get a citation on my door. Good neighbor Andy just guilt trips the heck out of us. I am pretty sure he has worked in our yard at least once a month. And I have such landscaping ignorance that half the time I do not notice exactly what he has done. I pull into the driveway and just think, "Dang my house looks good today." Then Richard tells me Andy was working in the yard again. And he only does it when we are not home. I think it is because he does not want us to tell him not to do it. But we certainly do appreciate it. Hey we had the yard mowed once in the three months we have lived here. See:


Our problem is that we need a lawnmower. Note the gutter set on the sidewalk. We have since fixed that. We have done other yard work, too. I have picked up trash at least twice. Once I found this:


Richard was like, "Quit taking pictures of abandoned baby clothes in our yard, and help me rake some leaves!"


We also cut down a dead (apple?) tree.

Before:


After:


We did not have the stump ground because we plan on including it into our landscaping. And because that would require money and a professional. I really think it will look good with roses grown over it. One day... when I learn how to make things grow.

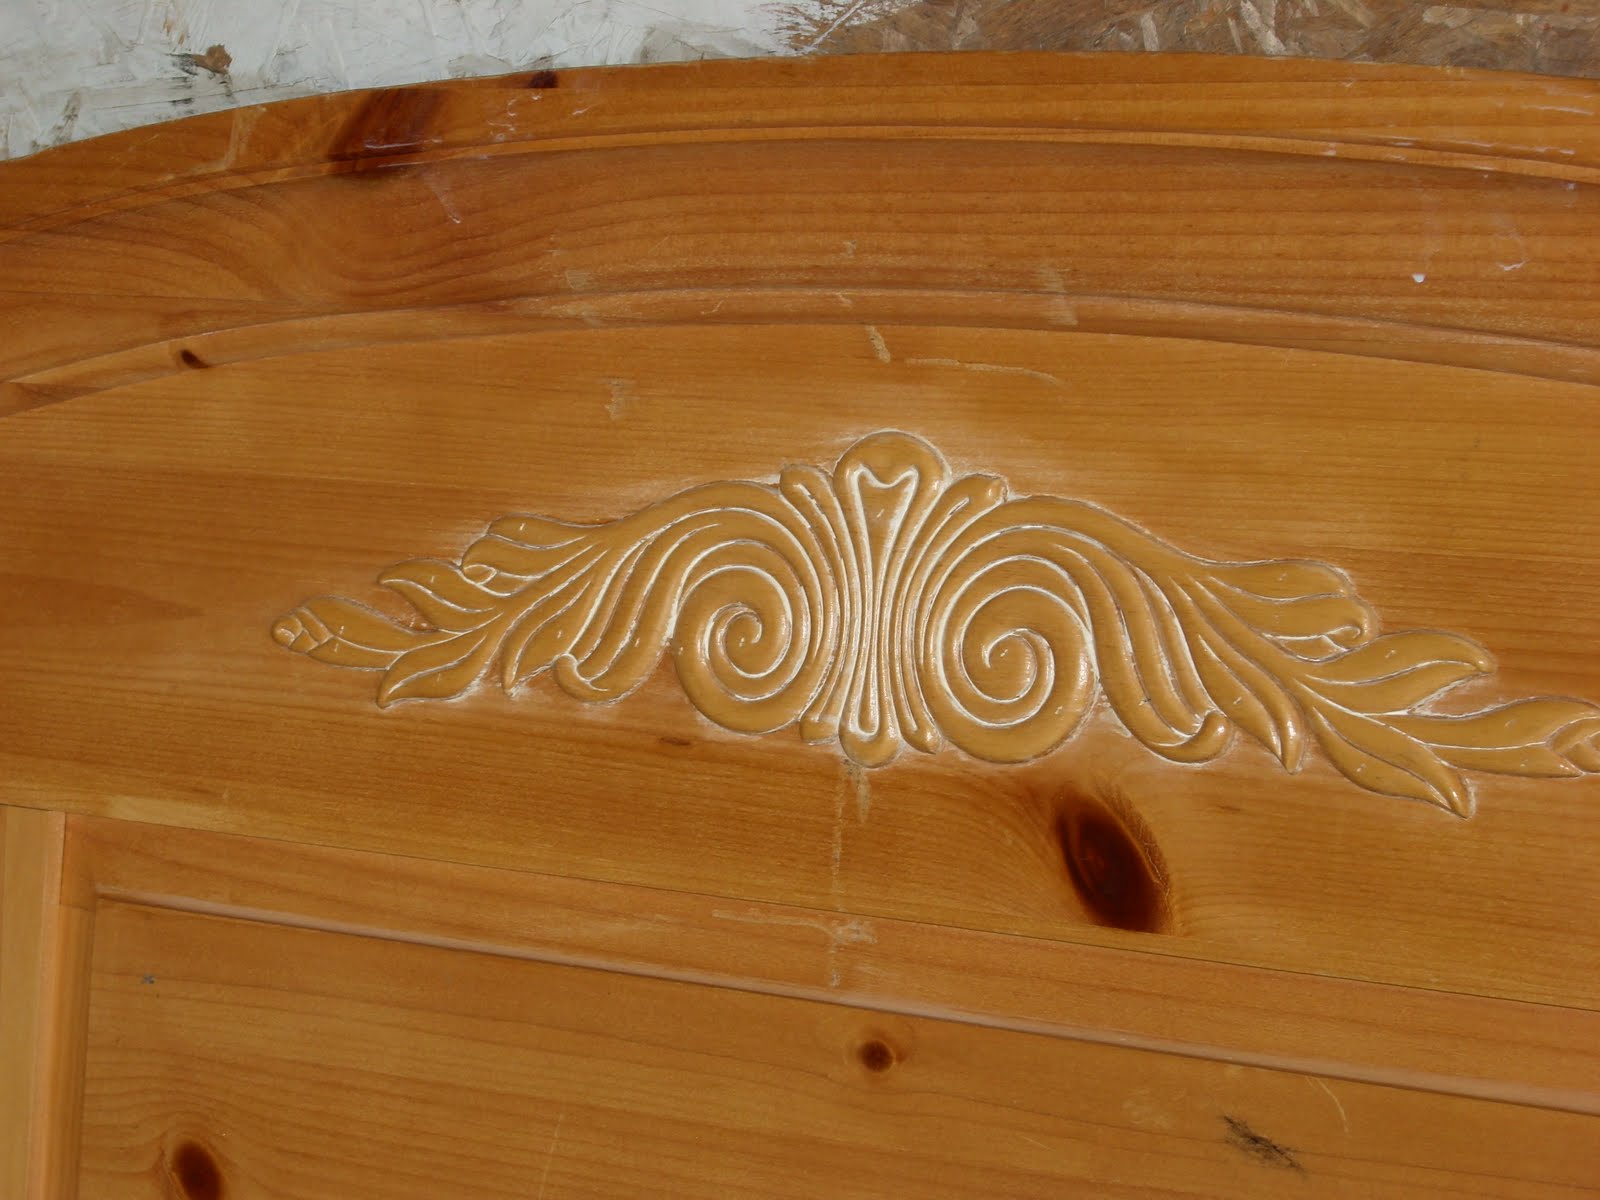
I think that is all we have done outside so far. There has been a little progress on the inside. I decided to paint our bed's headboard and footboard because I really didn't like the rustic 90s knotty pine look. Is that what it is called? That is what I call it. Plus the flower decal always looked really chalky no matter what I used to clean it. Richard was highly skeptical of me wanting to paint his bachelor bed, but it was our compromise. See, he loves the bed because he thinks it is really comfortable. And I only hated the wood stain on it. What is comfort without style? Useless, that is what I say. And that is why I never buy furniture without him. Here is what I had to work with:


So first I primed it, since that is what I always see them do on HGTV. That part went okay. I used Valspar because the guy at Lowe's talked me into it, even though my mother recommended Kilz. You will see what happened to me for dismissing my wise mother's advice.


It looked fine. I patted myself on the back and kept working. Also mimicking HGTV, I put the blue tape on the part I wanted to be a different color. Then I painted on two coats of the first color. Then I pulled the tape off:


"That was not supposed to happen," I thought in my head while pulling off the tape, "Oh well. I had to paint over that primer anyway." So then I put tape on the first color around where I was going to put the second color. I put on two coats of the second color, and whether the primer had come off or not made no difference. It looked exactly the same. A waste of time that primer was. Then I pulled the tape off the first color thinking my project was now complete. But instead of looking like HGTV material, it looked like this:


I was livid at that point. I was stomping my feet and screaming with my ipod on, so I have no idea how inappropriately loud I was being. I had been working on this bed painting project for a week! Any spare daylight hours I had I was out in the garage painting or making one of many trips to the hardware store to get the right brushes and tape. And now my marital bed looked like it had been in the back of a pickup since 1992. It might have been the tape, but I really think it was the primer because even before I applied the top quality blue painter's tape with medium adhesion, I noticed the lightest touch of my fingernail to the primer was causing it to scratch and peel, but I just figured that was because I had not put the color on yet. I decided the bed was going to be finished by night fall or else it would be added to the firewood pile. I just said, "Screw it! Forget tape. I am doing ONE more blue coat where it peeled with the steadiest hand I can muster, and if it does not look good, forget it!" And we were very fortunate because I actually think it turned out gorgeous, contrary to all my expectations. You be the judge:


So for the first time since we disassembled our bed frame in Lake county six months ago, we have a mattress that does not sit directly on the floor. And Richard actually likes it. It reminds me of Wedgewood. I just got a brilliant idea. Richard's mother gave me a beautiful piece of Wedgewood that I have not been sure how to incorporate into my life, and now I think it will be a beautiful decoration in our bedroom. I am shocked it looks good at all since I have never painted furniture in my life, and I mixed the colors myself out of leftover paint we had for the exterior. And the fact that the flower decal does not look terrible even though I did it completely by hand with no tape really boosts my confidence about being able to paint the rest of the house. We are trying to paint the ceilings and walls of the living and dining room before the floor restorers come just before Christmas. Our goal is Christmas because that is when Richard's father, mother, and sister will all be here for a few days and will be seeing our house for the first time. Personally I do not mind painting after the floors are done, but Richard is very concerned about paint spilling on the floor. I'll be using the five gallons I have left of the Valspar primer, so really if I just put blue tape over the spills, they should come right off :) There will be no more use of blue tape over Valspar, unless of course the goal is paint removal. And there will be no future purchasing of Valspar. Period. Maybe I am not being fair; perhaps it was user error in not sanding the wood surface prior to primer. But it is called primer as in "prime" as in "number one" or "first," so was I really out of line in thinking no work had to be done prior to primer? I don't think so.

This is the longest blog ever, and it has the most pictures. Also, I now have designated in my schedule Monday evenings for blogging, so you might want to check back then. I might get to it more often than that as I have time, but with all the painting planned before Christmas, I predict Monday evenings will be challenging enough.

Wednesday, November 4, 2009

Halloween et cetera

Here is what our house looked like on Halloween:


I must say the scariness of our house was lost in the picture due to my flash. There are no street lights, so the only light was from the green lights on the railing. And we played The Candyman soundtrack (thank you Ryan). It was very scary. Little kids had serious hesitation in coming up the stairs. We hope to add to our Halloween decorations over the year and eventually develop a haunted house of infamy. This year on decorations I spent less than $15. The lights were purchased for 90% off a couple Christmases ago. The two paper jack-o-lanterns on the bottom were 2 for $5 at Walgreens regular price. They are battery powered and resuable, so that's exciting. The top two are actual carved pumpkins costing $4 each. The black thing was a Martha Stuart project I found online made out of black garbage bags. I told Richard it was $40 marked down to $30, so I had to buy it. He actually believed me. Then I asked him to please have more faith in me than that.

I dressed up as Sarah Palin. It was very last minute.


I should have gone all out and cut real bangs. It only cost $9 for glasses in which I could not see and $11 for heels in which I could not walk. I was stumbling around all night. And it didn't help that Richard made up a really fun drinking game in which the four of us each picked a costume accessory, and anytime a trick-or-treater came with that accessory the other three had to take a shot. Mine was crowns, Genny's was wings, Richard's was anything Star Wars, and Ryan's was blue jeans. Ryan was losing terribly until all the teenagers found out we were giving out full-size candy bars. Good thing we were only taking shots of Boone's Farm*. Halloween was a blast this year.

Genny went as an 80s girl, but I thought she kinda looked like Bristol. Teens are dressing 80s now, aren't they?


The contractors came back for a day and got a lot more work done. I think they only have one or two days left. Namely they are going to install a gutter on the south side of the house and install a shower enclosure on the claw foot tub. After that, we will be totally free of our 203k commitments and be able to tackle things at our own pace to our own standards. I am greatly looking forward to that. The next big project we are working on is the back porch. Here it is from the outside:


Here it is just after we moved in. By the way almost none of the dates are correct on my pictures. I finally learned how to just omit the date altogether.


Here's what it looked like for the next two months while we lived in a construction zone:


And here's what it looks like at this very moment:


The contractors moved the washer and dryer to make it a more usable space. They also built a ramp which keeps them level, which is a big improvement. To finish the space, I need to scrape and paint the floor, put down some rugs, touch up the paint around the windows, scrape the paint off the transom glass, and replace the screen door hardware (it is very difficult to lock and shut). I also want to put a UV-blocking screen over the screens that are currently there to keep it cooler in summertime. And I want to put a shade over the light fixture, install a ceiling fan that is currently in the bathroom, and buy a large enough table to have coffee and breakfast comfortably. And I will probably add a utility sink where the plumbing was for the old washer, but I'm not completely sure yet. I hope I have some type of progress to report tomorrow.

* I don't really ever drink Boone's Farm. And I especially wouldn't shoot it. I'm all about true martinis or fine tequila neat. The last time I had Boone's Farm I was in high school, and it was with my mother. This was in accommodation of our guests. Please don't judge.

Wednesday, October 21, 2009

Never-Ending Hot Showers!

During our house inspection, it was brought to our attention that the unsightly, rusty, improperly installed water heater on the back porch is 25 years old.


Due to its age and the fact that much of the plumbing and ventilation would have to be redone because it was not up to code, we decided to go ahead and upgrade to a tankless as part of the 203k loan. We had to do things that would add to the resale value, and this qualified.

Tankless water heaters don't make sense for everyone. Even considering the 30% tax credit, it takes generally 20 years to pay for itself in energy savings, and that's about how long they are expected to last. Not only are they double the cost up-front than a traditional tank heater, they typically require costly upgrades in ventilation and plumbing. For example, ours cost around $2000 for the unit plus necessary upgrades, installation, and labor. If you just switch out one tank for another traditional tank, you'd probably be looking at around $500. However, like I said, with our other necessary upgrades to make it all "legal," it would have been over a $1000. So considering the tax credit, it was only a couple hundred more to go tankless. And that small amount of money will more than pay for itself over the lifetime of the unit because they are highly energy efficient. With a traditional water heater tank, you pay for lots of water to be be kept hot 24/7. With a tankless, it only kicks on when you turn on the hot water. It has a small gas flame that heats the pipe as the water goes through it so you end up getting never-ending hot showers! Here's what it looks like properly installed on the south exterior wall off the back porch:


There are only a few down sides. It does take a little bit longer for the hot water to come through, but only maybe 30 seconds more compared to a regular water heater. Another thing is a slight drop in the water pressure if you use two hot water appliances at once, such as a shower and dishwasher. But to me, that's a fair trade for never-ending hot showers! When I researched online, some people complained about the water not getting hot enough, and this really concerned me because I like really hot showers. So I brought this up with Justin the awesome contractor, and he said that they do have built-in controls in the tankless heaters that don't allow it to get really hot, but that, due to his awesomeness, he could override it. And it definitely hasn't been a problem. The controls aren't as simple as the little dial on a regular water heater's thermostat because you are not supposed to be able to adjust it. I suspect that these controls are in there to somehow keep it more energy efficient to qualify for the tax credit. Also, a huge bonus for us is that it cleared out space on the back porch (the black is the foam around the water line running to the unit's new location):


Yes, that's much better. We like to spend a lot of time on this back porch, and it can feel pretty crowded with a water heater, washer, and dryer. Now that the water heater is out of the way, we are going to move our washer and dryer against the narrower wall to the right. That will really clear out the porch. Here's what the porch looks like now:


When our house was first built (I'm guessing sometime between 1900 and 1905), It actually had very modern plumbing for its time. It had a fully working sink, toilet, bathtub...and a water heater! This was rather revolutionary. How do I know this? Well it just so happens that the owners of the house next door (the Pearsons) have owned the home since the 1940s, and have actually done very little to the house considering how much most old homes have been through since the 1940s. The son of the deceased Mrs. Pearson who lived there for all those years was kind enough to give us a tour, and I asked him a lot of questions. Here is the Pearson house next to ours for comparison:


One of the things that had been very curious to me was some odd cabinets in my kitchen. One built-in cabinet I was sure was original because it had the same ornate framing around it that every original door and window had. However, there was another set of built-in cabinets next to it that didn't have the same framing, but definitely looked old. The hardware on both looked decidedly 1940s. Here's what I'm talking about, the one on the right. Note the two vertical lines you can barely see above them that go into the ceiling:


"Hmm," I thought, "Looks like someone built another set of cabinets in the 40s and then replaced all the hardware to match. Why would they build cabinets specifically right here? Maybe there was a chimney here that they took out, so they filled it with cabinets." There is a wood-burning stove on the other side of the wall right there in the dining room, so that would make sense. Here's another shot:


Notice the frame on the top of the one to the left that isn't there on the ones to the right. The ones on the left originally had doors, but that's another blog to come. That this was a  former chimney was my theory until I saw the Pearson kitchen. When I went into their kitchen, I saw a pass-through just like mine leading into the dining room, except theirs still had the ORIGINAL DOORS AND HARDWARE! That is very exciting for an old house enthusiast like me. Theirs had never even been painted and still had THE ORIGINAL FINISH! Okay that practically never happens. I was overjoyed. I knew instantly that our house had to be built by the same builder. I mean, they look very different from the outside and have rather different floor plans, but so many of the finishing details were exactly the same. (It turns out they were both built by (Henry?) Retterath.) And to the right of the pass-through, where my kitchen has built-in yet unmatching cabinets, the Pearson kitchen had...well I can't really think of how to explain it. It's like the wall became U-shaped right there. There was nothing there. Just a 3-sided indention in the wall. The Pearson's had a stove sitting awkwardly in front of this void in the wall. I guess if you look at my cabinets and just imagine that instead of cabinets, the wall is just set back a couple feet right there from floor to ceiling, that would properly describe it. So I asked Mr. Pearson why their wall looked like that, and he told me that that is where the original water heater went when they built the house. Then it all made sense. So in the 1940s when the Forsythe's were updating the kitchen, they moved the water heater (I'm assuming a newer one) to the back porch to make more room for cabinet space. And here we are 100 years since the ground-breaking automatic water-heating tank was first installed, and we've installed a state of the art tankless water heater (and once again freed up the back porch). History repeats itself. I can't imagine water heating technology ever advancing past tankless. I mean, never-ending hot showers!

Monday, October 19, 2009

The Finished South Wall

The last post ended with the terribly bad south wall:


 It looks much worse than the rest of the house. It is also the only side that is not visible from the street. It gets the most sun and the most rain exposure because it's the only side without a porch. And for whatever reason, it's the only side without a gutter. And, as fate would have it, it's the only side that didn't get painted before the previous owner (PO) was foreclosed on. When the PO bought this house back in the 80s (when I was just a baby down in the Dirty South), He painted the whole house. Then when he was trying to sell it some time around 2003, he repainted the house, except for this one side. Repairing this side was the most major thing that had to be done with the 203k money.

The bottom skirting had to go. It was rotted. The siding was hit and miss. Some boards had to be replaced, but since it was redwood, it fared pretty well given the circumstances and mostly only had to be scraped, sanded, and repainted. When they first took off the skirting, the side of the beams that were touching them (the only side you couldn't see down in the basement) were heavily damaged by termites. Though we never saw any actual termites, the damage they left behind was severe. I probably could have kicked in some of the beams myself. This was quite a surprise. Had we known the contractors would have to jack up half our house and replace the supporting beams, we probably wouldn't have bought the house. Not that it was a difficult or trying experience, it just sounds scary. I mean, I didn't have to do anything. I just went outside and brought the guys coffee every once in a while. Not a big deal. Why does everyone whine and complain about contractors? I have no idea. Our contractor was awesome. His name is Justin Chaney, and he operates out of Orland. I will post his phone number as soon as I find it. After all the unexpected work they had to do, the project still came in under budget. Here's what it looked like while they were working on it:


The guy in the orange shirt is Justin, the awesome contractor. Too bad I didn't get pictures of the eaten out beams. I had to leave during a large part of this due to the death of both of my grandfathers. These pictures were actually taken by our very considerate and helpful neighbor, Andy. Anyway, here's what it looked like afterward:


Before:


After:


It still hasn't stopped raining, so I didn't have very good lighting, but it is the same color as the rest of the house. Note the lack of doggy doors. You can see the stickers still in the new windows. Though I didn't want to replace the windows, the ones on this side had to be replaced according to the bank giving us the loan. At least they are all on the side you can't see from the street. And since they had to be replaced, we got one of the most energy-efficient kinds available. After all, this side does get the most sun.


Here are the old windows. We used the parts we needed from them to fix other broken windows in the house. There were two with cracked glass, a few broken weights, and lots of missing hardware. There is still lots of missing hardware unfortunately. I don't know if the PO took them with him when he moved out or if someone came in during the very long time the house sat empty and removed them. Several door knobs were also missing. At least I have a few of the original so I can replace the missing ones to match eventually. For now, I don't know what to do with these windows. I guess I should keep them lest something happen to one of my other windows. Several people told me they are worth money and advised me to sell them on Ebay, but I looked and couldn't really find anything comparable. Plus they are in really bad shape, and worst of all, the glass is not original, which I think is the expensive, rare part. My understanding is that the technology to make perfectly smooth glass panes didn't develop until the 1930s or later. So old glass has a wavy effect with lots of little imperfections in it. Most old house restorers find this charming. I believe all my glass was replaced in the 1980s when PO first bought it and was doing lots of things. But I don't really know this. They might have been replaced in the 1970s when the Penningtons modernized it with popcorn ceiling and such. I'm not sure. But either way I'm really glad they were never completely replaced. I still have one wavy glass window in the water closet (half bath off the kitchen). I suspect it was not replaced with smooth glass because the waviness added to the privacy of the bathroom. Anyway, I'm trying to decide what to do with these.

Well that's it for today. Next I'll talk more about the water heater and wood-burning stove.